Wednesday 31 October 2012

I recently downloaded an app from the Autodesk Exchange App's store called 3D Pdf Convertor for Revit by 3DA Systems.

This app ties into Adobe's 3D Technology and allows you to easily publish your Revit Project as a 3D PDF. the resulting 3D PDF is a lot smaller file but your still able to view and orbit the 3D model.

Very easy to use, the help menu is very clear with graphics showing you what to pick and click....pictures are always a help!

During creating the 3D PDF you have the ability to change visual styles, detail level, change the appearance and the back ground to mention but a few. 

Here's a couple screen shots of the results.

There is also the ability to save as a "PRC" file format.... I didnt know what a PRC was either but this is what I found out..

PRC is a 3D format that lets you create different representations of a 3D model. For example, you can save only a visual representation that consists of polygons, or you can save the geometry that the model is based on. You can apply compression during conversion to decrease file size, or afterward in Acrobat® Pro Extended. By using PRC, you can create PDFs that are interoperable with Computer Aided Manufacturing (CAM) and Computer Aided Engineering (CAE) applications.

Benefits of PRC format
  • Allows storage of large CAD files to PDFs that are a fraction of the original size.
  • Supports post-conversion compression for faster loading.
  • Can represent Product Manufacturing Information (PMI), also referred to as Geometric Dimensioning and Tolerancing (GD&T) or Functional Tolerancing and Annotation (FT&A).
  • Can retain geometry for reuse in CAD, CAM, and CAE applications.
  • Allows you to add 3D models to 2D files. With this you input information on your template along with the 3D model for better visualization for clients.
you can do so much with the tools available in a 3D PDF, here are some screen shots of my results showing some of the tools.
 
 Here are the viewing tools.

The Default Views
 
View Styles
 
 
Lighting Styles
 
Section tools.


These in conjunction with the review and commenting tools sure make this a powerful tool for review and sharing with your clients and consultants.

Here is a link to their web site: https://www.3dasystems.com/
 
Sc
 

Tuesday 30 October 2012

Railing in 2013

Here is a link to a great post by Luke Johnson at "What Revit Wants" on using the railing tool in 2013: http://whatrevitwants.blogspot.ca/2012/10/revit-2013-railings-almost-7-months-old.html?

Luke... another Revit Jedi!

Sc

Monday 29 October 2012

Cloud Rendering Vs Revit Rendering

I love the Cloud rendering feature Autodesk offers to Subscription members!
It's fast and easy to use.

BUT!.......

The materials when rendered in the cloud don't match the same materials in Revit!
The reason for this is that the cloud rendering engine is different from the Mental Ray that we get in Revit.

Here is a sample of a rendering in Revit, it was set to "Best" and the file is one of the Revit sample file we get.

Rendering created in Revit


Here is the rendering created using Autodesk Cloud Rendering.
 
Rendering in the Cloud
 
Big difference eh!
 
I don't mind the difference in Quality, I expect a better quality product from the Cloud..... but I don't expect such a big difference in how the materials are interpreted, especially coming from the same company... Really, Autodesk should have looked at this before offering the service.
 
This really limits how much we will be using this service, if we cant trust how the materials are going to display it negates the speed and efficiency of the service. We spend time on selecting the right material according to how it shows up when we render and sending it to the Cloud every time we want to check a material becomes inefficient.
 
Subsequently we will only render in the Cloud now when materials and colours are not crucial.
 
Sc


Wednesday 24 October 2012

Work Smarter... Not Harder

I'm all for working Smarter not Harder.....

I think that's why I'm a BIM manager... lol!  I'm a lazy tech!

So often I see people designing and drafting in 2D and I wonder why...!

On the other hand I quite ofter see Revit models that are "Over Modeled"! (but not in my firm). 

It's a balancing act, input only the information you need to output!

BimBuilder blog recently posted this Image below.
As he mentions, "you can walk from New York to California just as easy as taking a plane... but which is more efficient?" which I thought was a great analogy!


On the back of my business card is a quote from Carl Bass from Autodesk University 2011

"Tools are what amplify our capabilities"

I truly believe this... with the right tools (software in our case) we can design and create amazing things.

Get tooled up!

Sc.


Monday 22 October 2012

Revit for Conceptual Design... Yes or No?

I recently posted this comment to a Linkedin Revit Group on  Revit is not efficient for conceptual models ! Do you agree with this?
Thought I'd share it here as well...

It really depends upon the user, I have some power Revit users that wouldn’t hesitate in starting conceptual modeling straight in Revit, all the tools are there and available to you, it’s just a matter or knowing what’s available and learning how to use it. Other designers are not so familiar with Revit and prefer to use Sketchup or AutoCAD.

Don’t try and force people to choose one over the other, Designers are creative people (nature of the industry) if I try to constrain them and limit the tools that have available to them all I’m doing is constraining their creativity and ultimately they’ll feel that and leave!

What I choose to do (as BIM Manager) is provide guidance and boundaries and provide information on how and when we transition from one software to another, in our case when we stop modeling in Sketchup or AutoCAD and rebuild the model in Revit.

Even when a conceptual design is created in Revit we will stop and rebuilt the project again in Revit when transitioning from Design Development stage, the reason for this is that DD is inherently a fast paced, quick and dirty design process. We want to think fast and throw down ideas as they come. It’s a very creative process that doesn’t focus so much on accuracy… unlike Preliminary Design…

So a documented process where my designers have the flexibility to use the tools they are comfortable using…. And a given point where they know to take it into Revit for further development.

Works for us!
 
Sc

Wednesday 17 October 2012

The Four Approaches to BIM

A good friend of mine by the name of Bruce McCallum who is the National Design Technology Manager for DIALOG recently shared with me this graph of the Four Approaches to BIM

Bruce is also a Revit Jedi...

He kindly gave me permission to share this graph with you... :-)
(Copyright DIALOG)


Here is the definition of each "Approach"

Lonely BIM
Singular Disciplines, not sharing the model outside.
Basically the Architect is using Revit to model to create the traditional drawings....

Shy BIM
Multiple disciplines involved sharing models only within the consultant group.

Friendly BIM
Sharing of the morel with the consultants, owner and contractors.However the model is not a contractual document.

Social BIM
Integrated Project Delivery (IPD) contracts, the model is a contractual document.
Fill collaboration between owner, consultants, contractor and suppliers. BIM is used throughout the planning, design, construction and operation of the building.

Awesome stuff..... but how often do we see Friendly and Social BIM actually happening?
From what I see (here in BC Canada) it's gaining momentum... doesn't happen on a lot of projects but on the really big projects I see and hear about "Social" BIM. For the most part it's still "Shy" BIM and less frequently "Friendly" BIM.

And do you know why????
I believe it's because Social BIM still falls outside of the comfort zone of a lot of firms. The process is different and affects the traditional design process and contract agreements. Also (understandably) liability plays a huge role.

Standing outside your comfort zone is challenging for anyone....especially if your company is at stake... I'm just thankful that the company I work for is forward thinking and see's the benefits.

This doesn't mean that it happens all at once..., the wheels turn slowly (as they should) but at least they're heading in the right direction ;-)

I hope your wheels are turning and pointed in the right direction as well....

Sc

Monday 15 October 2012

Hide at scale courser than...

Why don’t my Section Markers show up on my Site Plan? You may ask!!

Well, here is the answer!

Under the Instance Properties of the Section (pick the line of the section to see the properties), you will find a little known parameter called; “Hide at scale courser than” where you can select a scale from a drop down list.


Depending on the scale you select will determine whether or not the section marker will be visible or not. For example if you select 1:100 and your site plan is 1:500 you will not see the Section Marker, if you select the scale to 1:500 the section marker will now be visible on your 1:500 Site Plan view.

Remember this is an instance parameter, you will have to adjust the “Hide at scale courser than” scale for each section marker that you want to see.

Sc

Friday 12 October 2012

Hey YOU

Hey You! Are you going to AU?

Autodesk University deadline for the early bird discount runs out on the 15th.

If your not already registered... do it now!


Ok good, your back...

You wont regret it, it's a great event and well worth the time and $$, you'll associate yourself with like minded individuals and expose yourself to some real talented people..

Wait... that sounds weird! Especially since its in Vegas!

Ok... let me try again... 

Attending the AU sessions will be of great benefit. Not only attending the sessions but the networking opportunities at the social events such as the beer bash and the Exhibition Hall.

Ok, its fun and you will be smarter when you leave!

Getting smarta every day.

Sc

Wednesday 10 October 2012

Revit Sample Files

Ha! I wanted to find the sample files that come with Revit and after searching everywhere I finally found them!

C:\Program Files\Autodesk\Revit Architecture 2011\Program\Samples\

For all you sample files!

Sc

Monday 8 October 2012

Using the Silhouette tool

Ever used the Silhouette tool in Revit??

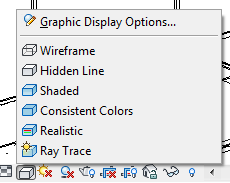
This is applicable for both RAC 2012 and 2013, however in 2013 you can use the silhouette tool on all view types whereas on 2012 it’s only available on Wireframe, Hidden Line, Shaded and Consistent Colours.

Under the Graphic Display Options you can select what line style you can use for Silhouette…. But firstly let me explain exactly what this feature can do…

When using Silhouette you can select a Line Style that will be applied to the leading edge of objects.
See the effect on the samples below.

In the days of hand drafting I was taught to outline the building and main features with heavy pen, this would help define the building and make the sheet easier to read… the Silhouette tool will do this for you.

You can select from the drop down selection the range of Line Styles available to you, what I have done was created a new Line Style called “Silhouette” which I can then adjust the line weight as desired.

Revit will automatically apply a line style to silhouette edges.

All Silhouette edges are view-specific, so if you want to apply the Silhouette to other views just create a View Template which you can apply to the other views.

After you have applied silhouette edges to the model, there may be edges you do not want to display in silhouette. You can remove these lines as necessary.


To apply a line style to a silhouette edge:

  1. On the View Control Bar, click  > (Visual Style) > Hidden Line, Shaded, or Realistic.
Silhouette edges are not available for Wireframe or Shaded model graphic styles.

  1. On the View Control Bar, click  > (Shadows Off/On) > Graphic Display Options.
  2. In the Graphic Display Options dialog, in the Model Display panel, select a Silhouette style (for example, Wide Lines).
  3. Click OK.
To remove a line style from a silhouette edge:

  1. Click Modify tab View panel (Linework).
  2. In the Type Selector, select <Not Silhouette>.
  3. Select the edges in silhouette, and the silhouette is removed.
     No Silhouette   
 

 Silhouette using Medium lines
 

Making your drawings Pop!

Sc


Thursday 4 October 2012

Using Adaptive Components as a Rafter

I've been playing with Adaptive Components as we have a project where we need to design a undulating ceiling that have rafters that follow the form.

I made a short video and posted it on Viemo on my efforts on creating this: https://vimeo.com/49469767


Firstly I started with a generic Adaptive Component family template and created a simple extrusion between two (Adaptive) points. "Saved this as Adaptive Rafter".

Start a New Conceptual Mass, and using the Splines Through Points tool draw two lines that will represent the two sides of the outline of the undulating ceiling.

You can refine the location of the outline of the ceiling by creating a grid and accurately placing the pline node points according to your design, you can then manipulate the height of the nodes under the properties.

Using the Divide Path tool to specify how many components you want arrayed along the two plines which are the outline of my ceiling, attach the first point of the adaptive component to the first node on your spline and then the second point to the opposite node.

Use the Repeat tool to array the component along your spline placing components along the divide path points.

You can then flip to a 3D view to manipulate the node points flexing the design.
 
 
Couple things to remember when playing with the Repeater, check the properties when your creating it, there is a check box that will make the component "Always Vertical" when you load it into your new Mass.

If the path has adaptive points, check the Orientation parameter of those points in regards to placement; sometimes you need the points need to be "orthogonal", sometimes "vertical", etc.

Got this advice from Alfredo Medina when I posted a query on the Autodesk Forum.

Pretty cool stuff!

Sc


Monday 1 October 2012

BIM In Progress

I stumbled across this Blog the other day while looking for some information on space programming using masses, ended up subscribing to the Blog and reading all of Ken's posts.

Ken Flannigan from BIMinprogress writes some great posts, like me he also comes from an industry and a Autodesk reseller background and seems passionate on sharing information about BIM.

On the link I have here he shares some great advice for when learning not only Revit but it also applies to any new software.
http://biminprogress.blogspot.ca/2012/05/habitually-successful.html

Well worth subscribing too, check it out.

ALSO... There is a troublemaker in our midst !!!
Actually he writes a pretty good Blog on advanced Revit.
http://bimtroublemaker.blogspot.ca
Found it quite interesting...

Good on ya Ken and you ya Troublemaker! 
Fellow Revit Jedi's...

Sc