Thursday 31 October 2013

Happy Halloween!!

For my North American Friends... Happy Halloween...

For my non North American Friends....This is some kind of pagan ritual where small children, quite often accompanied by their parents, roam the streets knocking on strangers doors, dressed in a costume, demanding candy (chocolates and sweets etc), whereupon they then threaten the residents with a "trick" if they don't fill their (large) container with confectioneries. 

As someone who did not grow up with "Halloween" and who only experienced this yearly ritual as an adult I quite enjoyed the carving of a vegetable which I then placed a open flame inside and situating this vegetable by the entrance to my house. !!? Weird hu!

To this day I still enjoy this yearly pagan tradition even though my own children are no longer of a suitable age to participate.....still, I like to roam the streets knocking on strangers doors dressed in a costume demanding to be fed.

Either way, enjoy this time of year...

Sc

Wednesday 30 October 2013

Using the Filter Selection Tool in Revit

Whenever you select multiple objects in Revit the Selection panel becomes available under the Modify Tab.


Here you’ll see the Filter tool that will open a dialog box listing the number of objects and their categories.

Using this tool makes it easier to select harder to pick objects such as the floor slab or if you want to pick a group of objects.


 There are some additional tools available alongside the Filter icon, Save, Load and Edit.

*These tools are also available under the Modify tab on the Selection panel.


The Save Selection tool allows you to save the selected elements as a Group which you can retrieve latter. When saving, you name the set for future reference. You can retrieve this selection again after you have invoked the filter tool again by once again selection multiple items, you can then select the Load icon to Retrieve Filter sets.


The Edit tool allows you to edit the elements in your selection list.

After you have retrieved a selection set you can modify the saved selection by using the Edit Selection tool under the Modify tab on the Selection panel.

Here the Edit Selection Set Ribbon tab will display a selection of tools allowing you to edit the selection set.

Add and Remove objects to the selection set.

Note: You cannot add categories to a selection-based filter.
To use a selection box to select multiple elements, first select Multiple on the Options Bar.
Draw the selection box, then click Finish on the Options Bar.


You can also access your Filters from the Graphics panel on the View tab.

Monday 28 October 2013

Autodesk's Photo Editing and Sharing software... Pixlr

So way back in 2011 Autodesk purchased a photo editing and sharing company called Pixlr
Pixlr's tools are designed so users can easily create, edit and share images on a social network such as Facebook and Flickr etc. 

Autodesk software users (including SketchBook) are able to read and write image files such as PXD and exchange these files while maintaining the file integrity... such as layers.

Pixlr has some awesome image editing tools that are free and easy to use online.... 
Anyway.. the reason I mention this is that I finally got around to adding the Pixlr app to my Google Chrome...  


When it first came out that Autodesk bought Pixlr I thought that was a weird acquisition by Autodesk.. but after thinking about it Autodesk is collecting tools that we can use as part of our design development. 

After all who doesn't touch up their renderings with a little "Photoshop"?

Sc
 

Thursday 24 October 2013

BIM Networking Event

I'm running another BIM Networking event here in Kelowna at the Coast Capri Hotel on November 20th.

We have three presentation by local members of the industry:

Drew Jarvis – Cansel: Engineers and Architects are realizing the efficiency and cost savings that EdgeWise Building and Edgewise MEP brings. EdgeWise for Revit has a lightning-fast workflow that allows you to go from field-to-finish Revit deliverable in record time. 

Ben Rawlingson – Focus Engineering: Ben will demonstrate the ability of Autodesk® Infraworks to quickly generate 3D models, creating infrastructure designs and proposals in the context of the built environment.

Robert Parlane – CEI Architecture and Trevor Butler – Integral Group: Trevor and Robert will explore how a modern administration centre for the Glenmore Landfill addresses these targets through the principles of regenerative design, environmental footprint, holistic solutions and  industrial ecology.


Click on this link to register: 

See you there...

Sc

Monday 21 October 2013

Glenmore Administration Building wins a 2013 Community Recognition Award

At a recent Wood WORKS BC 2013 Convention, the Glenmore Administration Building won a Canadian Wood Council award for Community Recognition.


Image with caption: "SILGA - Southern Interior Local Government Association: Glenmore Administration Building, Kelowna - City of Kelowna. Photo credit: Courtesy: CEI Architecture (CNW Group/Canadian Wood Council for Wood WORKS! BC)". 

Congratulations to this collaborative team:

Architect - CEI Architecture
Structural engineer - Bush Bohlman and Partners
Mechanical & electrical engineer – Cobalt Engineering
Civil engineer and Surveyor - MMM Group
Cost Consultant - SSA Quantity Surveyors Ltd.
Landscape Architect - Site360 Consulting Inc. (MMM Group)
Geotechnical Engineers - Interior Testing Services


The Landfill Administration Building has two primary functions. On the lower level there are full change rooms, the upper floor there are offices for administration staff and a training suite for all staff.


A visitor component provides outreach to educate school groups and the general public on the work undertaken at the landfill site, and illustrate the benefits of recycling both on the global scale environmentally, and to the local community financially.

The design aims to reduce the energy use of the building by more than 40 percent over current standard building practices. By adopting conservation and ‘low tech’ passive capture solutions, the building will greatly reduce overall energy, water and resources demands.

Through the use of composting toilets and diverting all grey water back to the landfill to boost methane production the building the building avoids any discharge to the municipal sewer system.  This is the first use of composting toilets in the Okanagan Valley.

By following regenerative principles, such as methane gas generated from the landfill as the fuel source, and utilizing materials reclaimed from landfill, the scheme will become a truly place-based solution.

Check out this blog on the bottle wall which is part of the design of the project.

Sc


Wednesday 16 October 2013

Save the Date!!

November 20th 2013.
Coast Capri Hotel Kelowna
7 P.M. – 9:30 P.M.
  
No… it’s not a Wedding…. It’s another
BIM Networking Event!

Another fantastic opportunity to network with those locally in the AEC industry and see some great presentations!

Stay tuned… more information will be available soon

Sc

Monday 14 October 2013

How to Create a Tapered Opening Family

I recently had a question from a friend on how to create an opening in a concrete wall.


Here’s how….

I first started with the “out of the box” Opening Family.

Create a copy and rename it accordingly ie; Opening Tapered.

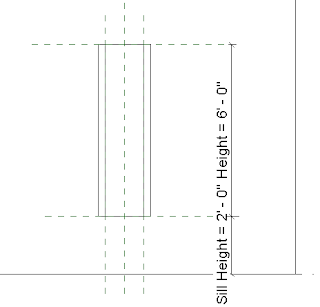
Flip to a 3D view and delete the opening, you’ll still see the symbolic lines in Plan view.


Add reference lines from the intersection of the left reference plane and the center of the wall at the desired angle (or if your taper in off center you’ll have to create another reference plane parallel to the center of wall and add a parameter controlling it). Mirror to the right side.


Adjust and lock your symbolic lines to suit.
Hint: Tab over the end of the line to get the end point to lock to the reference plane.

Under the Create Tab, on the Forms panel select the Void Extrusion tool.
Create a Void Extrusion locking the sketch lines to the exterior and interior wall planes and the sides and tapered reference planes.

Finish the sketch.

Use the Cut Geometry tool and select the wall and then the void you have just created.


Go to the Placement Side elevation view and drag and lock the shape handels up to the top reference plan and do similar to the bottom shape handel to the lower reference plane.


By using the existing Family Type Parameters flex your family to make sure it works properly and all geometry is locked to the appropriate reference planes.


Save then load into your project and flex the family to check to see if it works properly…


Sc...

Update...

Here's a link to the family I created.
Go to the link and download the attached file.

Let me know if there are any issues... its my first time using this method.

Sc


Friday 11 October 2013

Autoturn for Revit... Finally!

Yeah!  Finally..!!.Transoft Solutions have finally caught up with the rest of us and will be releasing Autoturn for Revit.

They're having a free live presentation on Tuesday October 15th 2013 for North America and Friday October 25th 2013 for Europe, Middle East and Africa.

About time!!!!

"AutoTURN lets you analyze and evaluate vehicle maneuvers for projects such as intersections, roundabouts, bus terminals, loading bays or any on/off-street assignments involving access, clearance, and maneuverability checks."


Sc

Thursday 10 October 2013

Good advice from a "Spaceman"

Chris Hadfield (Canadian Astronaut and former commander of the Space Station) recently spoke at a local (KLO) Middle School here in Kelowna.

One point he made that really resonated with me was... "you can make some big decisions, but it's the little decisions you make every day that turn you into who you become"

Said by a man who was inspired by the Apollo moon landing on TV, went on to earn an engineering degree at Royal Military College, become a test pilot for the Canadian Armed Forces, obtain his masters degree in Aviation Systems... and then be accepted into the Canadian Astronaut program and eventually command the International Space Station... 

At 54 he recently retired.

Sounds like he knows what he's talking about.... it'll be interesting to see what Chris does in his retirement!!

Inspiring!

Sc.


Monday 7 October 2013

Pelicans - Not Revit Related

Pelicans are an interesting species of birds... Living mostly along the coast and Outback Australia as a child I've kind of grown up with them...If you've ever seen the 1976 movie Storm Boy you'll know what I mean!

I kind of have a love hate relationship with them after being "Savagely Attacked" by a Pelican when I was about 5 (or maybe 7, I cant remember). At the time the psychotic bird was just as tall as me and he (or she) tried to eat me! Leaving a scratch along my face from it's razor sharp tooth at the end of it's beak that nearly drew blood!!

Anyway... I'm over it now but I keep a safe distance from from these unpredictable descendants of dinosaurs......

The reason I bring this up is that my parents just returned from a cruise up the east coast of Australia and my mum (please note the correct spelling of the abbreviation of Mother for my North American colleagues) sent me the following photo... bringing back the horrific memory leaving me huddled in the corner of our kitchen muttering about vicious bird... just like the Alfred Hitchcock movie The Birds!


So how does this relate to Revit or BIM you ask!
Ummmm.... I have a cool Pelican Case I use to store my training laptops in when I'm traveling...!

Sc...

Thursday 3 October 2013

Evernote and Autodesk a 360 Marriage!

Coming soon to your computer and tablet.... Autodesk recently announced that Evernote will be intergrated into AutoCAD 360.
So Happy Together


Basically what this means that if you use Evernote you can create notes when reviewing your drawings using 360 on your i-pad and access these notes elsewhere on your other devises... phone, computer etc...

“The AutoCAD 360 Evernote integration allows our customers to collaborate better using two tools they know and love,” said Amy Bunszel, vice president of AutoCAD Products at Autodesk. “Users can move seamlessly back and forth between AutoCAD 360 mobile and Evernote, enabling instant access to their DWG data and associated project data stored in Evernote.  It’s the best of both worlds and even better - you can take it with you on your mobile devices.”

Check it out!

Sc

Tuesday 1 October 2013

3D Printers....In SPACE

NASA recently announced that they are preparing to launch a 3D printer into Space

"NASA is preparing to launch a 3D printer into space next year, a toaster-sized game changer that greatly reduces the need for astronauts to load up with every tool, spare part or supply they might ever need."

Awesome....I'll volunteer to be tech support! 

I wonder if they'll use the MakerBot Replicator 2 or 2X?


Sc