Friday, 30 March 2012

Cooee!

Totally not BIM related but of some interest.

Cooee! is a shout used in Australia, usually in the Bush, to attract attention, find missing people, or indicate one's own location.

I used cooee a lot as a kid growing up in the outback of South Australia and as a teenager traipsing around the bush off the coast of New South Wales. A colleague in my office mentioned it but however not in this reference, it made me question the origin of this unique call.

"Sections quoted from Wikipedia"

When done correctly - loudly and shrilly - a call of "cooee" can carry over a considerable distance. It is also known for a call of help in which can blend in to different natural sounds in the bush.

The word "cooee" originates from the Dharuk language of the aboriginal inhabitants of the Sydney area. It means "come here" and has now become widely used in Australia as a call over distances.

Richard White indicates the important means of demonstrating Australian nationality with the call taking on a consciously nationalistic meaning. He also documents its spread through the Empire, to New Zealand and South Africa.

So if your ever out in the bush and you hear some calling coooweee it's not a bird or a crazy person (well... maybe crazy!) it's just a lost Aussie.

Wednesday, 28 March 2012

Graphic Display Options

Ever found that the shade on your colour perspective prints using the Graphic Display Option Shaded or Consistent Colours print too dark?

Like this:

Shadows may appear ok on the screen but as I have found when you print it, it comes out too dark.


You can actually manipulate the Density of the Shadows by going too the Graphics Display dialog box and select Graphics Display Options.


On the Graphics Display dialog box you'll find a variety of tools that allows you to subtly manipulate the visibility of your model.


If you move the Shadow bar down to 30 you'll see the shadows lighten up considerably.


Lighter Shadows set to 30.

Some of the other options on Graphics Display dialog box include Show Ambient Shadows which gives you the affect of diffused light. For example light shining through the windows.

You can also put in a Gradient background, Ghost surfaces and much more....

Check it out next time your doing some simple presentation views.

Tuesday, 27 March 2012

Revit 2013 What's new

No point in me re-creating the wheel.... there are so many blogs out there now on the new products it's amazing.... and difficult to filter through...!


I watched the Autodesk media summit earlier today which was quite interesting, it was a general overview of Autodesk direction some new features etc... nothing too specific. I would imagin there would be WAY too much to pack in if they went into too much detail.

David Light has done an excellent job of summarising what's new with Revit 2013 and I highly recommend you visit his site to see what's new.

http://autodesk-revit.blogspot.ca/2012/03/what-new-in-autodesk-revit-2013.html

I will probably start blogging about the new features as soon as I get the software (probably by mid April)...

For those of you who will be attending my BIM User Group meeting on the 4th of April, we'll be going over the new features of Revit (Architecture, MEP and Structure).

Enjoy!

Scott

Monday, 26 March 2012

Phasing, Phase Filter and Phase

Here is my attempt to explain Phasing and Phase Filters.. a very complicated thing to try and explain and this is a primer to help you understand it better.
When encountering a project with existing construction I write a description of the 3 Phases we need for any Project, namely an existing phase for the existing base conditions and a demolition phases for modification to existing and construction/renovation for any changes after.  The description will help explain each phase of construction/destruction.

If were just doing New Construction (all in one phase) the other phases are irrelevant.

If your doing New Construction in multiple Phases you can add it here such as New construction Phase 1, New construction Phase 2 etc...

Then I add to the Phase Filter Names to make them easier to understand.

By adding "In Current Phase" to the "Filter Names" to remind you what you are looking at, for example: Show Previous + Demo (In Current Phase) means that you will see the complete work in the phases preceding the active phase...as well as demolition in this active phase.

More on this latter...


I then override the Cut Line Graphics of the Demolished Phase so it shows up bold.

This imitates standard Architectural convention.

Currently the default is to be grayed out.

This allows me to clearly show what part of the building has been demolished in each view.

Close this dialog box and go to your floor view.

Now you can add more Phases of New Construction, as mentioned above, as required. You can also add more Phase Filters but we have found that given the 7 combinations that Revit gives you is more than adequate. 

Now that we have established the Project Phase it's time to look at how to apply them to our views.

If you are doing a Renovation/Addition project you'll need to create multiple Duplicate Views. We do this so we can easily represent each phase (Existing, Demolition and New Construction) on each view.

We also need to set the Phasing for each view.

Here is an example of how the View and the Phase Filters and Phase selections are used.


Existing View

With any Renovation/Addition project you need to know what Existing Building you are dealing with, in this View you'll draw the existing building.

Your Existing View Phasing should be set as follows.


Phase Filter will be set to Show New, only because there is no previous phase.
The Phase is Existing because that's what your currently creating, so an existing building in the real world is "New Construction" in "Existing" Phase....confusing I know!
Existing View show the existing building.

Once you have the existing building modeled, Duplicate the view and rename it to Demolition.


Demolition View

This view you'll use the little hammer icon on the Phasing panel on the Manage Tab and hit the stuff that is to be demolished. Duh!

Notice that if your demolishing an existing wall that has doors or windows you will have to demolish those as well (if they're being demolished as well that is).

Your Demolition View Phasing should be set as follows.


Phase Filter will be set to Show Previous + Demo, as you want to show the Previous phase which is Existing and the Demolition occurring in the active "Demolition" phase.
The Phase is Demolition because that's what your currently creating.


Demolition View show the existing building and any components of the existing building that are to be Demolished.
Once you have the Demolished view created duplicate the view and rename it to New Construction.


New Construction View

This view you'll start placing walls and components that are part of the projects New Construction.

Your New Construction View Phasing should be set as follows.


Phase Filter will be set to Show Previous + New, as you want to show the Previous phase which is what will be remaining of the Existing Building minus the Demolition as well as the New construction.

What is shown in "Show Previous" is the "Completed work" for all phases preceding the current phase. So what we are looking at is Existing (completed) and Demolition (completed) plus New Construction.

The Phase is New Construction because that's what your currently creating.


New Construction View should clearly show the New construction as well as the existing building after demolition has occurred.

Note: Any model objects you create while in a specific Phase will be part of that Phase, thus controlled by the Phase filters.


Filters not only apply to Plan Views but also too your other views including Sections, Elevations and also 3D Views.
When you Shade the view the Material assigned to the Phase Status now comes into to play.


If you look Under Materials you'll find phase materials for each Phase. These Materials have colour shading assigned to them to clearly show each phase.
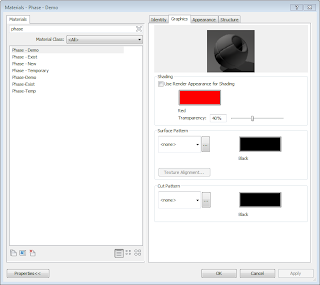


Also... Thanks Adam for reviewing this document for me and adding your thoughts. I felt it to be such a difficult subject to document,  I appreciate Adams input.


Sunday, 25 March 2012

Revit 2013 Sneak Peek

Revit 2013 is officially released on the 27th but I think I have an idea of one of the new features...


Don't quote me but I think we will be able to have mode less views... meaning I'll finally be able to drag my floor plan view onto another screen while Revit is open on another screen... without having to drag Revit across both monitors.


Currently you can only do this with the Properties Palette and the Project Browser....
I guess we'll have to wait and see on the 27th....

Friday, 23 March 2012

Stair and Railing Category

Once again Luke Johnson from "what Revit Wants" has posted another great blog... this time he's posted a link to download a file that contains in-place and component families that are of the "Stair" and "Railing Category".

Check it out....

http://whatrevitwants.blogspot.ca/2012/03/in-place-and-component-families-of.html?utm_source=feedburner&utm_medium=feed&utm_campaign=Feed:+WhatRevitWants+(What+Revit+Wants)

Keep up the good work Luke!

Cheers,

Scott

Wednesday, 21 March 2012

To the Cloud!

I've been hearing the term "Send it to the Cloud" here in the office so much lately now that we are doing more and more rendering online using Autodesk's Online cloud rendering service.

If your not using the Online cloud Rendering service offered to Revit Subscription users your missing out on a great service.

We use Cloud Rendering for a number of reasons... it's quicker, it take the pressure off our workstations allowing the users to move on to something more productive rather than wait for a rendering.

 It does a pretty good job of rendering as well, one feature I especially love is the "Panorama 3D view" which allows me to orbit around within the rendering view... unfortunately I cant export the panorama view or share it yet.... were going to look into how to do this on line securely...

The Autodesk cloud services is not limited to just Rendering, you can also run Energy Analysis, Optimization and Collaboration....

you have some limitation in regards to space.... but for us it's working out Great!

"The core benefits of Autodesk Cloud, available to all Subscribers, are also available free of charge with 1GB of cloud storage space. Subscription customers receive 3GB of cloud storage per seat on Subscription."

Monday, 19 March 2012

Downspouts

Found this great article written by Alica Craig from Hagerman & Company on their eNewsletter explaining how to create Downspouts.

It's well written and clearly explains a couple options on how to create the downspout for the gutters of a roof.

http://newsletters.hagerman.com/newsletters/ebul93-Tip-AEC.htm

Friday, 16 March 2012

BIM and the Future of Construction

David Light recently wrote a Blog  titled "Are Architects doing enough to be BIM leaders?"
http://autodesk-revit.blogspot.com/2012/03/are-architects-doing-enough-to-be-bim.html

This gave me pause for thought....

I had a interesting conversation with the Business Manager of a large Architectural firm in Vancouver some time ago and one of his comments on BIM was the person who benefits the most from BIM is the Owner or the Developer of the project. His comments were quite interesting and have given me food for thought.

Owners and Developers are the ones who greatly benefit from a project that is completed using BIM and collaboration.

Architects, and consulting Engineers do benefit from BIM by being able to model the building and the ability to co-ordinate their drawings. However they have been creating construction documents long before Revit and BIM came along and they are quite happy to continue doing so using the traditional tools.

Only those that want to produce a better product and service for their clients will adopt the true meaning of BIM. By collaborating not only with the consultants but also with the suppliers and the owner can true BIM be achieved, it takes participation by all those involved within the project for it to be a true success for all involved. The rest will follow along and start using products like Revit, stating that they are now "BIM Enabled" but in reality they have just exchanged one tool for another and continue producing construction documents and not sharing their models with the contractors, suppliers or owners.

BIM = Building Information Modeling.... Is basically constructing the building digitally prior to "breaking the ground". Incorporating not only the "how too" Information on construction but the analysis of how the building performs, accurate quantification of building materials, construction scheduling as well as construction analysis (constructability) as well as the benefits gained after the building has been built and occupied with the use of building life cycle management. 

Those firms and designers who are stepping up to the plate and embracing this "New Fad" called BIM will be not only be successful in their business but will be contribute to society by creating sustainable, livable environments.

BIM is more than just modeling the design, it's the sharing of information for the benefit of the project.. it's not altruistic... we still need to create a successful business, but making such simple changes in our way of thinking and including such things as Integrated Design Process, we can achieve both.

There are already both private and government organizations that are specifying that in the near future (if not already) all projects will be done using BIM.

Within 10 or 15 years will all design and construction be done using BIM?
I don't know.... but the way the current trend is looking I think it'll be sooner rather than latter.

Ask around..... see who currently is using BIM.


Thursday, 15 March 2012

Organic modeling.

Luke Johnson of "what Revit Wants" Blog recently posted on Freeform and organic modelling from MeshMixer to 3ds Max to Revit

Basically it's about MeshMixer which is software that allows you to sculp objects. He also shows how to bring it in to 3Ds Max and then into Revit.

This got me thinking....

A few months ago I met a guy who was using the Mass forms in Revit to create Artistic Sculptures, he amazed me with his unique use of Revit.

It amazes me how people are using software like Revit and MeshMixer to create artistic forms, and trust me it's not just the young who are experimenting with this technology.
The guy I was talking too was in his early 70's.

Wednesday, 14 March 2012

Revit 2013

March 27th is the official date that Autodesk and anyone associated with Autodesk is officially allowed to talk about the new products line....

However Lynn Allen is already Blogging on AutoCAD 2013 http://lynn.blogs.com/lynn_allens_blog/2012/02/autocad-2013-is-approaching-the-finish-line.html

Can wait till were able to talk about the new version...Lots of blogging going on then I bet!
I already know about a couple big changes which I don't think will be a surprise to anyone.......

So the count down begins.......tick... tick... tick.. tick...

Monday, 12 March 2012

Tiled Views on another screen

Aghh !!!.... I need  a bigger Monitor.....

Really, I could do with a 32" monitor.....actually I need two of them.... (notice I said need not want... I'm starting to sound like my kids!).

Wouldn't it be nice if we could drag a tiled view onto another screen?
We can do it with the Properties Palette and the Project Browser so why not with a View?

So I have placed a poll question at the bottom of this blog, it closes on the 1st of April so if you have an opinion on this I'd be interested in hearing it.

Please select the answer yes or no and we'll see what the results are and then we'll see if we can persuade Autodesk to have a look and see what they can do...

Oh, and stretching Revit across duel screens dosent cut it for me... I actually want to be able to plave a view on another screen.
:-)

March 28th: So I have loaded the new release and apparently you still cannot drag a model view "out of Revit" ;-(

Friday, 9 March 2012

Project Browser Customization

A colleague here at work found this U-Tube video on how to customise the Project Browser using Project Parameters.

Looks pretty good, we are going to look into how effective it works for organising the project Browser in Revit when it comes too contract administration drawing files such as Change Order, Site Instructions etc...

Check it out.

http://www.youtube.com/watch?v=ldJ3p9r-b3U

Wednesday, 7 March 2012

Phase Filters and Phasing

I was having difficulties explaining Phases for a Renovation project were working on that included Demolition, New Construction, Existing building and even Temporary construction in between...

I found this great blog by Harlan Brumm from way back in 2008... (ahhh the good old days).

He explains this confusing subject very well.
http://revitclinic.typepad.com/my_weblog/2008/10/time-to-phase.html

Basically what I found was that my Architectural way of thinking was tripping me up, you have to look at it two ways....... anyway before I try to explain it and confuse you, read Harlan's Blog ..... 

Tuesday, 6 March 2012

Monday, 5 March 2012

Line Pattern Vs Line Styles

Here is a clarification on the difference between Line Patterns and Line Styles and where they belong in the Scheme of things Revit.
 
Line Patterns:

Line Patterns are the style of line (or, Line Type if you are  familiar with ACAD) that you can assign to a Line Style.

You can create Line Patterns by selecting the Line Pattern icon as shown on the left.

Create a New Pattern and give it a descriptive name. Fill in the Pattern Properties chart using Dash, Dot and Spaces 

Note: you need to end with a Space and you need a space after each Dash or Dot segment.

Give descriptive names to your line styles, this will make it easier to identify.

You can vary the length of each segment and use any combination of the three to create your Line Pattern. 


The Dot's do not require a value as they are all drawn at 1.5 points.

The value given to the Dashes and Spaces are the printed lengths regardless of the scale that your view is set too. Revit will manage your linetype scale (ACAD term there!) for you.


Line Styles:

Now you have created your Line Pattern you can now assign this to a Line Style.


Select the Line Style Icon under the Additional Settings drop-down and create a new Line Style, then from the Line Pattern drop down you'll be able to find your new Line Pattern you just created.

Don't forget to also assign a line weight to your new Style as well.


Here is the Line Pattern I created applied to my new Line Style. This Style works for both Model Lines and Detail Lines.

Create the Line Styles you need and include them in your template.
You should only really need to create a new Line Styles only when it's Unique to the specific Project.  

Friday, 2 March 2012

BIMbyScottC Blog name change

I will be changing the name of this Blog to The Revit Jedi.....


I've mentioned this name in previous blogs and have had a positive responce to it.... so I thought I'll give it a try. I have searched but have found no other blog by this name but if there already is I will probably change the name back.


I will be changing the name after this  Blog post.


Not sure how this will affect those that subscribe to this blog, I will do some testing to see what ramifications there will be to the name change...

Take a quick Survey to let me know your thoughts:
http://www.surveymonkey.com/s/69P53LF