Monday, 30 January 2012

3D Walkthrough - The Basics

Impress your clients by creating a simple walk through or walk around or the project.
Here I'll show you the basics of how to create a walkthrough, you can improve you walkthroughs by manipulating the settings.

Start by going to the plan view, either the top view of a 3D View or a floor plan view. For this example I'm going to work in a 3D view.

On the View drop down select the Walkthrough icon.

This will then bring you into the Modify/Walkthrough ribbon.

Start by looking at the Option bar for camera options, here you'll be able to make your camera views a Perspective or not, set the offset from your level and also select the level.

I typically choose 5'-10" Offset which is close to my eye height. sometimes I make it really high (like over 25') which gives you the impression of looking down onto your model.

Then picking camera points along the path you want to take.

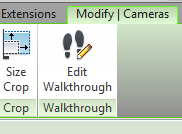
Then select the Edit Walkthrough icon to activate access to the cameras, the little red icon in front of the camera controls the direction of the camera and the blue circle controls the depth of the camera.

Go through each Key Frame and adjust the camera depth and angle, you don't have to do this for each frame just the Key Frames.

Select the Open Walkthrough icon to open the camera view.


Here you can change the Visual Style to either Shaded or Realistic and turn off the crop region box.

You can also play the video and make any changes required. click anywhere on the screen to exit the walkthrough editor and to reopen the walkthrough editor right click on the Walkthrough title in the Project Browser and select Camera. With the editor open you can switch from camera view to plan view etc.

To create a path that moves the camera up or down Edit the Walkthrough and change the controls on the Option Bar to Path, now you can go into a elevation or 3D view and manipulate the camera key frame points either up or down.
When your done and ready to export your Walkthrough you need to have your walkthrough view open then go to the Export option under the Application Icon as shown...

Pick Walkthrough, this will then open up a dialog box where you can manipulate the length, Visual Style and dimensions of the video.

Then another dialog box will pop on Video compression, I typically select Uncompressed to get the best results but you can play with this to reduce your file size and type.

There you go!

You've created a walkthrough video....

Next look at some of the options like Slowing down sections of Frames under the camera properties, altering the length of the video or un-checking Perspective on the Options Bar.


Thursday, 26 January 2012

Australia Day January 26th

Happy Auatralia Day for all my Aussie rellies and Friends...

Here are some fun facts about the Land Down-unda....

On the 26th of January, 1788, The First Fleet of 11 ships with 1500 aboard, half of them convicts from Britain, arrived at the south eastern shores of Australia. The town of Sydney grew from that first small, British penal settlement. Australia day commemorates this.

 Officially the Commonwealth of Australia, is a country in the Southern Hemisphere comprising the mainland of the Australian continent, the island of Tasmania, and numerous smaller islands in the Indian and Pacific Oceans.

For at least 40,000 years before European settlement in the late 18th century, Australia was inhabited by indigenous Australians. After discovery by Dutch explorers in 1606, Australia's eastern half was claimed by Great Britain in 1770 and settled through penal transportation to the colony of New South Wales from 26 January 1788. The population grew steadily in subsequent decades; the continent was explored and an additional five self-governing Crown Colonies were established.


On 1 January 1901, the six colonies federated, forming the Commonwealth of Australia.

The flag of Australia is a defaced Blue Ensign: a blue field with the Union Flag in the canton (upper hoist quarter), and a large white seven-pointed star known as the Commonwealth Star in the lower hoist quarter. The fly contains a representation of the Southern Cross constellation, made up of five white stars – one small five-pointed star and four, larger, seven-pointed stars.


Waltzing Matilda" by Banjo Paterson is Australia's most widely known bush ballad. A country folk song, the song has been referred to as "the unofficial national anthem of Australia".

The title is Australian slang for travelling by foot with one's goods in a "Matilda" (bag) slung over one's back. The song narrates the story of an itinerant worker, or "swagman", making a drink of tea at a bush camp and capturing a sheep to eat. When the sheep's owner arrives with three police officers to arrest the worker for the theft, the worker commits suicide by drowning himself in the nearby watering hole and then goes on to haunt the site.

 Australia produces 95 per cent of the world's precious opals and 99 per cent of its black opals. The world’s opal capital is the quirky underground town of Coober Pedy in South Australia. The world’s largest opal, weighing 5.27 kilograms, was found here in 1990.

Kalgoorlie in Western Australia is Australia's largest producer of gold. It also embraces the world's largest political electorate, covering a mammoth 2.2 million square kilometres.

 
Queensland’s Great Barrier Reef is home to the world’s largest oyster, weighing up to 3 kilograms, while the world’s longest earthworm, stretching up to 4 metres, is found in Gippsland in Victoria. The heaviest crab, weighing up to 14 kilograms, is found in Bass Strait near Tasmania. Australia’s tallest mountain is Mt Kosciuszko, which is 2,228 metres above sea level.

The world’s longest piece of straight railway track stretches 478 kilometres across South Australia’s vast, treeless Nullarbor Plain. Australia’s longest stretch of straight road - 148 kilometres – is on the Eyre Highway in Western Australia. It’s just a tiny portion of the 2,700 kilometre sealed road that takes travellers from Perth to Adelaide. The world's longest continuous fence – the dingo fence – was built to keep sheep safe from Australia's native dog and runs for 5,531 kilometres through central Queensland and South Australia.

Australians invented notepads (1902), the surf lifesaving reel (1906), aspirin (1915), the pacemaker (1926), penicillin (1940) the Hills Hoist clothesline (1946), the plastic disposable syringe (1949), the wine cask (1965), the bionic ear (1978), dual-flush toilet flush (1980) anti-counterfeiting technology for banknotes (1992) and long-wearing contact lenses (1999).

The kangaroo is unique to Australia and appears on our coat of arms. It is a mammal and a macropod, a family of marsupials that includes wallabies and pademelons. Kangaroos are the only large animals to travel by hopping and breeding adult males often fight by boxing with their front paws and kicking their back legs. There are 55 kangaroo species spread across Australia.


Platypuses are small, dark-brown, furry, egg-laying mammals with webbed paws and a duck-like beak. Platypuses live in burrows which they dig into the banks of rivers. They are diving animals, and can stay under water for up to fifteen minutes. Unlike a duck's beak, the platypus' beak is rubbery and flexible. It has hundreds of electroreceptor cells inside it, which can detect the electrical currents that are caused by its prey swimming through the water. Platypuses can be found along Australia’s eastern coastal areas in small streams and quiet rivers.


The Australian Coat Of Arms has on it a kangaroo and an emu. The reason for this is that the kangaroo and the emu cannot go backwards but can only walk forwards.


Wednesday, 25 January 2012

Curtain Wall in a Wall

Just a quick tip on inserting a Curtain Wall into a Regular Wall.

When embedding one wall type into another wall you can use the Cut Geometry tool to easily cut one wall out of the other wall.

Here's how.....

In plan view draw the wall you want to embedded on top of your Host wall (it's not really a host though!). In this case I have drawn a Curtain Wall on top of a Masonry Wall.
You will receive a Warning stating that the highlighted walls overlap. Revit then suggests you use the Cut Geometry to embed one wall into the other.


Note that if you do this with a Storefront type wall it will automatically cut out the Host wall.


Flip to a 3D view or a Elevation then select the Cut Geometry tool.
Pick the Host wall then the wall to cut with...


Then your done.....

Monday, 23 January 2012

Converting Type Parameters to Instance Parameters


Here's something that I just discovered....I guess I need to look a little closer as I don't think it's a new feature!

I was working on an existing window family making some modifications by adding some parameters to make the window more "Flexible".... Anyway I discovered that you can convert existing Type Parameters into Instance Parameters simply by simply checking the "Instance Parameter" check box on the option bar after you have selected the Parameter dimension.. Sooo easy!

Here's an example....


Here I converted a Type Parameter that controls the Mullion height into an Instance Parameter.

For this window I also made the vertical mullion an Instance Parameter (but note, I had to then add a reference plane to re-establish the center of the window) so now I have total control of the Mullions for each instance of this window.

Friday, 20 January 2012

Blog Audience

I've noticed that I've been getting a lot of hits lately from Lebanon, so...

مرحبا بكم في مدونتي... ألف بلوق مكرسة لجميع الأشياء للعمل مع نمذجة معلومات البناء وإدارة بيم.

Bienvenue sur mon blog ... Un blog dédié à toutes les choses à faire avec Building Information Modeling BIM et de gestion.

The above is in Arabic and French.

Thursday, 19 January 2012

Quick Tip - Multiple lines of Text in View Title

Here is a Quick tip on how to add multiple lines of text to your View Titles.

You need to go to the properties of the view and there you'll find the "Title on Sheet" parameter. If you want multiple lines of text on the title DONT change the View Name... it wont work.


Start typing in the Title on Sheet box and whenever you want to start another line use Ctrl+Enter key, this will start a new line for you.

Wednesday, 18 January 2012

3D Text - Another Way.....

A colleague where I work showed me this trick as he was creating signage for a car dealership that required a colour face with white sides. This process doesn't use the Model Text tool in Revit.

 Here's how it's done...

1: Import a JPEG image into AutoCAD and trace the outline of your text or logo. I used AutoCAD because I have access to it and I find it easier to sketch lines but you could do the same process in Revit.


2: Import in your Cad file into Revit and do a full Explode so you can access the linework.


Select all the lines and use the Cut to clipboard tool to save the lines on the clipboard.


3: Open a New Family Template based on the Generic Model Face Based file.
Paste from the clipboard your linework and move into position as required.


4: Start the Extrusion command and using the select linework sketch tool pick the linework you just pasted.

Set your depth on the options bar and then hit the green checkmark to complete the task.

Assign a material to your Sign, this is now the base of your new sign.

5: Go to a side view, select your Sign and create a copy (remembering to unconstrain) and change the depth of the copied sign (I chose 1/2").
Change the material of the copied sign and move to the top of the other one.
 
There you have it... Insert your sign as a component into your Revit Project and place your new sign on the wall of your building.

Monday, 16 January 2012

Roof Dormers Made Easy

There is a tool on the Openings panel under the Home Tab called Dormer.
I recently rediscovered this tool, it's a great tool for creating your dormer openings....


I use to just cut the opening by editing my roof sketch but this tool does it much better and easier....

It's easy to use, after you have created your dormer roof and walls on top of your main roof you can use this tool to cut the opening in the main roof.

Here is my building with a hip and shed dormers.


Here I have hidden the dormer roofs to show the main roof below.

Now to use this tool you first need to select the main roof (the one you want the hole in), then Revit will ask you to pick Roof/Wall edges....

This is not as easy as it seems!!!
I prefer to work in a 3D view so I can easily select the objects I need too.

Pick your dormer walls (three of them). then pick the dormer roof (doesn't have to be an edge you just have to pick the dormer roof itself).

Revit will draw sketch lines  representing the outline of the opening within the main roof.  Note: you don't have to clean up these sketch lines, you can leave them untidy.


Hit the Green check mark and your done!!!

You Should now have an opening in your main roof similar to this (I hid the roof):

Wednesday, 11 January 2012

Object Visibility Keyboard Shortcut

A colleague showed me a quick way to change the visibility of your model objects. Thanks Adam ;-)

After selecting an object (in this example I selected the trellis) type "EOH"


You'll see the selected object will change to Halftone to change it back to Fulltone just select the object again (the trellis) and once again type "EOH"


If you select your desired object and type "VOH" it will Halftone the entire category.


Here I selected the Garage doors and typed "VOH" and as you can see it changed all my doors (the door category) to Halftone. Select and type "VOH" to bring back to Fulltone.

Friday, 6 January 2012

Unloading Revit Add-In's

So I'm having some issues with the new Room Renumbering tool and as part of the debugging process I had to unload all the other Revit Add-in tools that I have....

Lance Coffey from Autodesk Technical support directed me to the Revit Clinic Blog on how to unload and Revit Add-in tools you may have.

Here is the link to that blog:
http://revitclinic.typepad.com/my_weblog/2010/05/disable-addins-for-revit-2011-products.html

Here are the basic steps on how to unload your Add-in tools.... handy to know...

Fill in the blank #### depending on what year version you are using, ie: If your using Revit 2012 input 2012 where I have shown ####

Firstly Close Revit. Yes I know it sounds stoopid but you'll be surprised how many times I have tried to monkey around with the program while I have it open.....

Then llocate the following folder:
for windows Vista and windows 7: C:\ProgramData\Autodesk\Revit\Addins\####

For Windows XP - C:\Documents and Settings\All Users\Application Data\Autodesk\REVIT\Addins\####

Move the add-in files from the folder above to another location. I created a folder in my add in folder called temp files and dumped the add-in files into that using the cut function.

Start Revit and your add-ins will be disabled.
When testing is complete move the add-in files back into the original folder.

Brilliant !!!!

Wednesday, 4 January 2012

MakerBot

Ok, I'm back from a hectic Christmas break and I'll get back to blogging real soon.
I found this on Shaan Hurleys blog Between the lines: http://autodesk.blogs.com/between_the_lines/

Apparently he got a MakerBot 3D printer.
Looks like a lot of fun....Now how to I convince my Wife I need one???
check it out...
http://www.makerbot.com/