Wednesday, 29 February 2012

Box Cornice with Overhang Rake (aka Pork Chop Roof)

Here is the process of creating a "Pork Chop" roof line... like so.
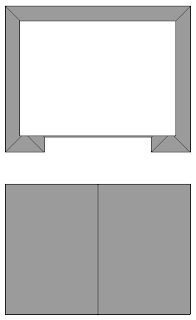
Like many Revit Roofs this one is made up of two separate roof sections, the upper gable and the Lower Hip.
 
Firstly draw your bottom Hip Roof like so.


Note: I used the offset tool when sketching the inner box which is basically the "cut-out" of the roof. These lines have no slope.


Then create the Upper Roof.

This is easy, it's just a gable roof of the same type and pitch.

I pull the ends in so the base Hip Roof overhangs more than the Upper Gable Roof.


Now that the two parts of the roof are now created and lay evenly on top of each other (this is important otherwise they wont join properly) you can use the Join tool to make them look like one roof.

Then apply your gable walls, fascia board and gutters and your done!

Here is the sequence.


You'll also notice that I created a Dutch Gable on the other end.


Tuesday, 28 February 2012

2012 BIM Networking Event Photos

Here are some photos taken at the BIM Networking Event in Kelowna on February 22nd 2012.

Thanks to all my sponsors and the guest Speakers, Chris Klassen - Stantec, Dan Sadler - PCL Construction and Steven Dean - Autodesk.


Monday, 27 February 2012

Wrapping Wall Components - Explained

Here is a quick explanation of wrapping wall components in Revit Architecture.
When you decide to wrap either the Interior or Exterior of a complex walls you have the option to select which Components you wish to wrap.
You can select which components  when you edit the structure of the wall.

Here all Components are checked to wrap.

Here is what this wall looks like.


Here  only the EIFS Components is checked to wrap.

Here is what this wall looks like.

Friday, 24 February 2012

Troubleshooting Revit

I read on this mornings "The Revit Clinic" Blog a post by Lance Coffey who is a Autodesk Product Support Specialist on "Tools for Troubleshooting Unexpected Behavior in Revit". 
It's a great Blog and well worth a read. 

You often wonder why Revit acts the way it does and quite often it's because we have inadvertantly told it to do so....

Check it out.

http://revitclinic.typepad.com/my_weblog/2012/02/tools-for-troubleshooting-unexpected-behavior-in-revit.html?utm_source=feedburner&utm_medium=feed&utm_campaign=Feed%3A+typepad%2Ftherevitclinic+%28The+Revit+Clinic%29

Thursday, 23 February 2012

Wrapping at Ends - Explained

Here is a quick explanation of the wall wrapping function in Revit Architecture.
I looked everywhere for an explanation on the difference between Exterior and Interior and couldn't find anything!!!  So here is my explanation of the difference between the two.

Under the properties of the wall you have the option to change how the wall ends appears.
None, Exterior and Interior.

If you apply either the Exterior or Interior Wrapping at Ends to a basic wall that only has one finish outside the Core Boundary, say a typical interior wall that has only one layer of drywall, you wont see any difference.

The reason being that the one layer of material is the same on the exterior side of the wall and the Interior side of the wall.

The Interior and Exterior options refer to the Interior and Exterior side of the walls (every wall had a interior and exterior side, look at the title next time you edit the assembly).

The Wrapping at Ends doesn't become apparent until you get into more complex walls that have more than one material outside of the Core Boundary.

Below is an example of wrapping at ends Exterior.
Here you see that all exterior components wrap at the ends of the wall.
You can select which components wrap by checking the "Wrap" next to each specific component when Editing the Structure of the Wall.


Below is an example of wrapping at ends Interior.
Here you see that all the Interior components wrap at the ends of the wall.
You can select which components wrap by checking the "Wrap" next to each specific component when Editing the Structure of the Wall.


Wednesday, 22 February 2012

BIM Article

Had to pass this along...

Reading Jay Polding's Blog "Revit In Plain English" he refers to an article he co-authored for the Canadian Consulting Engineer February 2012 Issue.

Quoting Jay's Blog... "Consultants share their insights into what it takes to successfully implement building information modeling. As it turns out, managing and understanding people is as important as being familiar with the actual technology..."

Interesting article.
http://www.canadianconsultingengineer.com/issues/de.aspx

Tuesday, 21 February 2012

Wrapping at Inserts - Explained

This is the first of three consecutive blogs on Wall Wrapping...
I've always struggled with how to explain how to use the Revit function of "Wrapping at Inserts" under the Wall Type Properties...probably because I have never really looked into it thoroughly enough... until now!

Here is an explanation of what it means to set the layer wrapping of walls at inserts and how to use this function.

Your basic compound wall can wrap around inserted objects such as door and windows.

Here is the difference between the options under the properties of the Wall.
Here you'll see the relevant component wrapping where it meets the window.


Do not wrap:
Here you see the wall components of the wall do not wrap around where the window sits.


Exterior:
Here you see the Exterior wall component wraps at the window insert.


Interior:
Here you see the Interior wall component wraps at the window insert.

Interior Wrapping at window Insert

(Image care of WikiHelp)


Both:
Here you see that both the interior and exterior wall components wrap where the meet the window.

The function of Wrapping around Complex Inserts works not only with Windows and Doors but with any complex shaped inserts.

Wrapping at window Insert Examples
(Image care of WikiHelp)


Friday, 17 February 2012

Repurposing the USB stick you got from Autodesk last year

Check out this Blog  "What Revit Wants" by Luke Johnson on re-purposing the USB stick you got from Autodesk with last years software on it.

Since were on Subscription we'll be getting another one with this years software on it pretty soon so why not recycle it right !!

Awesome blog... Thanks Luke!

http://whatrevitwants.blogspot.com/2011/06/repurposing-autodesk-usb-media_20.html

Wednesday, 15 February 2012

Decal Borders

If you have a situation where you have a decal that shows a black border around it that you don't want to see here are some options for you....
Unfortunately Decals are part of the "Object Styles > Model Objects > Generic Models" category and you cant really turn those off or manipulate them as it'll affect the entire generic model....but we can manipulate the Decals Graphics per Element.

You can turn on or off the Decal (or Image) frame like you can in AutoCAD.....BUT you can manipulate it to minimize it as much as possible.

Right Click on your Decal and select "Override Graphics in View > By Element" Here you can turn off the crossing lines by making them "Transparent". This doesn't affect the Decal Image only the black lines...

However I cant get the border to disappear, so if anyone has any suggestions on how to control that please drop me a line in the comments box below...

Cheers,
Scott

Tuesday, 14 February 2012

Happy Valentines

Happy Valentines,

I just found out how to make a heart symbol,  <3
Type the  "less than" key (next to the "M" key) and the #3.

Also...

Hold down the Alt Key and type the number 3 on your numeric keypad.

Amazing........

Monday, 13 February 2012

Disallow Join

I recently ran into an issue where we had a interior stud wall that butts up to a Curtain wall or a Store Front wall.

Similar to this:


Here you'll see a Stud wall butts up to the corner of a storefront wall at the corner mullion.


As you can see here the Stud wall want to join the Curtain wall at the location Line. In this case the Stud wall overlaps onto the corner Mullion of the curtain wall.


You cant drag the point away from the corner as it will join the Curtain wall.


Here is the solution to this problem.


If you pick the stud wall and right click right on the end control grip.... like so.....


The right click dialog box will pop up with the Option to Disallow Join. Select this and it will then allow you to drag the end grip away from the wall without it automatically joining the wall.


NOTE: Please note that you have to Right Click directly on the end grip, you wont get the same Right Click options if you just Right Click on the wall itself.

Friday, 10 February 2012

BIM Networking Event for Construction

I'm running another BIM Networking Event, so if your in Kelowna on February 22nd 2012 please attend.

Contact me to Register as seats are limited so please register early.


You are invited to attend the BIM Networking Event for Architectural, Engineering and Construction Industries.

 Wednesday, February 22nd

7 P.M. – 9:30 P.M.

Horizon Room at the Coast Capri Hotel

1171 Harvey Avenue, Kelowna


We will be having three guest speakers from different aspects of the Construction Industry:

Chris Klassen - Stantec: KGH Clinical Support Building: Challenges, Success, and Lessons Learned.
Steven Dean - Autodesk: Gain the competitive advantage...Industry focus, BIM Workflow and much more.
Dan Sadler - PCL Construction: How PCL Construction uses BIM for construction management..

Stay and join our Networking Session while enjoying a selection of Wine and Cheese and enter to win the Door Prize provided by Autodesk…

Wednesday, 8 February 2012

Josh...

Here is something not related to Revit but very inspiring.
My neighbour Josh Dueck broke his back in 2004 in a skiing accident... that didn't stop him....

See what this inspiring paralympian is up too now!

Amazing....
http://www.youtube.com/watch?feature=player_embedded&v=4xjUUf_sK84#!

More Keyboard Tips

Here are a couple more keyboard commands that I find useful that are not listed on my previous blog "Common Revit Keyboard Commands" http://bim4scottc.blogspot.com/2011/10/common-revit-keyboard-commands.html

You can move your ribbon tabs by holding down the Ctrl key and dragging the tab.

If you select a element and hold down the Ctrl key then drag the element you'll create a duplicate copy.

Monday, 6 February 2012

Cool Gadgets

I was just going through my notes that I took while attending Autodesk University last year and during the Key note address and came across my list of Really Cool Stuff! 

Totally irrelevant to Revit.... but not really!!!!

Check these out!

http://www.fitbit.com/ tracks everything!

http://zeocanada.com/index.html  Zeo sleep manager

http://www.withings.com/ Withings Scale - linked to your computer...

http://www.directlife.philips.com/ track your personal activity

http://greengoose.com/learn sensors that allow you to track everyday things...

Also during Carl Bass's Keynote address he gave a great definition of what a Tool is that I just love...
Thanks Carl.... Mate! 

"Tools are what Amplify our Capabilities"

I'm going to use that one!


Friday, 3 February 2012

Using the Sun to your Advantage - 2

Once you have set the location of your project and set your Sun Setting to be View specific, you can now change the aspect of the Sun.


Under the Sun Setting dialog box you can set the date and time which will specify the location of the sun for you.


Alternately if you turn the Sun Path on while in a 3D view you'll get a graphic showing the location of the Sun as well as be able to edit the time and date, same as what you would change on the Sun Setting dialog box but you get instant results.


You can also press and drag the sun around to the time and month you want as well... instant results!

Wednesday, 1 February 2012

Using the Sun to your Advantage

Ever noticed that when you spin your model around in a 3d view your shadows change sides.... it's like your rotating the model and the Sun stays in the same location!

Well that's actually what's happening!

Always seemed strange to me that this occurs, you spend so much time setting up the location and project north etcetera and the sun doesn't follow you as you rotate the 3D model!

Here is a easy fix....

On the Status Bar (that's the one on the bottom) click on the Sun Path icon and then select Sun Settings.


Uncheck the tick box for Relative to View.


This then tells Revit that you want the Sun to be relative to your view, not the other way around.
Now when you spin your model around you'll notice that the shadows stay relative to your model.

I much prefer this!

Check my next blog for more tips when using the Solar Settings.