Impress your clients by creating a simple walk through or walk around
or the project.

On the View drop down
select the Walkthrough icon.
 Then picking camera points along the path you want to take.

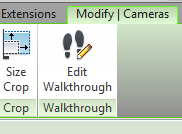 Then select the Edit
Walkthrough icon to activate access to the cameras, the little red icon in
front of the camera controls the direction of the camera and the blue circle controls
the depth of the camera.
Then select the Edit
Walkthrough icon to activate access to the cameras, the little red icon in
front of the camera controls the direction of the camera and the blue circle controls
the depth of the camera.
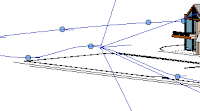
Go through each Key Frame and adjust the camera depth and angle, you don't have to do this for each frame just the Key Frames.
Select the
Open Walkthrough icon to open the camera view.

Here you can change the Visual Style to either Shaded or Realistic and turn off the crop region box.
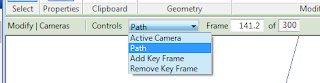
To create a path
that moves the camera up or down Edit the Walkthrough and change the controls
on the Option Bar to Path, now you can go into a elevation
or 3D view and manipulate the camera key frame points either up or down.
 When your done and ready to export your Walkthrough you need to have
your walkthrough view open then go to the Export
option under the Application Icon as
shown...
When your done and ready to export your Walkthrough you need to have
your walkthrough view open then go to the Export
option under the Application Icon as
shown...


Here I'll show you the basics of how to create a walkthrough, you
can improve you walkthroughs by manipulating the settings.
Start by going to the plan view, either the top view of a 3D View
or a floor plan view. For this example I'm going to work in a 3D view.

This will then bring you into the Modify/Walkthrough ribbon.
Start by looking at the Option
bar for camera options, here you'll be able to make your camera views a
Perspective or not, set the offset from your level and also select the level.
I typically choose 5'-10" Offset which is close to my eye
height. sometimes I make it really high (like over 25') which gives you the
impression of looking down onto your model.

 Then select the Edit
Walkthrough icon to activate access to the cameras, the little red icon in
front of the camera controls the direction of the camera and the blue circle controls
the depth of the camera.
Then select the Edit
Walkthrough icon to activate access to the cameras, the little red icon in
front of the camera controls the direction of the camera and the blue circle controls
the depth of the camera.Go through each Key Frame and adjust the camera depth and angle, you don't have to do this for each frame just the Key Frames.

Here you can change the Visual Style to either Shaded or Realistic and turn off the crop region box.
You can also play the video and make any changes required. click
anywhere on the screen to exit the walkthrough editor and to reopen the walkthrough
editor right click on the Walkthrough
title in the Project Browser and
select Camera. With the editor open
you can switch from camera view to plan view etc.

 When your done and ready to export your Walkthrough you need to have
your walkthrough view open then go to the Export
option under the Application Icon as
shown...
When your done and ready to export your Walkthrough you need to have
your walkthrough view open then go to the Export
option under the Application Icon as
shown...
Pick Walkthrough, this
will then open up a dialog box where you can manipulate the length, Visual Style
and dimensions of the video.

Then another dialog box will pop on Video compression, I typically
select Uncompressed to get the best results but you can play with this to
reduce your file size and type.
There you go!
You've created a walkthrough video....
Next look at some of the options like Slowing down sections of Frames under the camera properties,
altering the length of the video or un-checking Perspective on the Options Bar.

Nice to read a blog about 3d walkthrough
ReplyDelete3d walkthrough